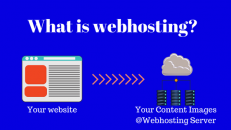


WordPress is one of the simplest and most intuitive systems available for designing and maintaining a website. Although every theme (explained below) may vary slightly in its appearance and operation, and plug-ins add additional functionality and sometimes complexity, the basics remain the same for any wordpress site.
Below is a good explanatory guide with visuals to get your familiar with wordpress and the admin dashboard , where most of the work gets done.
How to login to your WordPress Admin Dashboard
The Admin Area is the administrative area of a WordPress website. Usually it can be accessed by visiting the wp-admin directory in your web browser. Example: http://www.example.com/wp-admin/
The WP Dashboard
Immediately upon installing your WordPress theme, you will be presented with a page that looks something like the screenshot below.
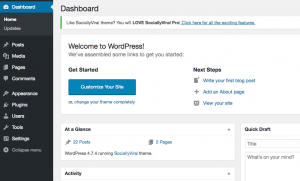
I am going to explain what each of the items (Posts, Media, Pages, Comments, Appearance, Plug Ins, Users, Tools and Settings) down the left hand side mean and how to use them beginning with Appearance. I’m starting with Appearance because this is usually the first place I go to when setting up a new WordPress site. It’s where you can customise it to the look that you want.
Note that you can’t always complete the customisation until you have created a few pages (such as an About page) and have logos and/or images ready to upload.
Appearance
Although each theme will vary with what customisations are available, there are some some common ones that most, if not all themes have. Below is a screenshot of the customisation available with the free WordPress theme Twenty Seventeen.
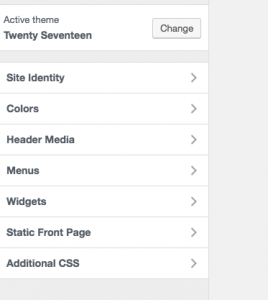
Site Identity is where you write the name of the blog and a tagline, if you have one.
Colors refers to the, well, colors ! Depending on the theme, you may be able to change the color of text, the background, any buttons etc
Header Media (often just ‘Header’) is where you would place an image to appear at the top of the page. On this website, you can see the image/logo for WordPress Australia that we have placed at the top of the page using this section.
Menus – Themes will typically have 1, 2 or 3 menus. In this part of the site you’ll be setting up where you want your menus located and what you want as a menu item. Typical items for a menu might include Home, About, Contact, Privacy.
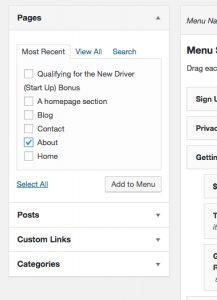
If you wanted to create a menu with About you would need to first create a page (see below) called About and then link the menu item to the page. You do this by selecting the particular page from the drop down box and then clicking “add to menu”.
You can also create menu items that link to a post, a category or anywhere else on the internet through a custom link.
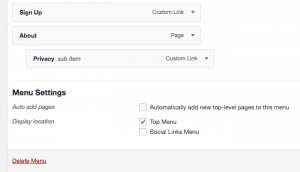
In the example below, I have set up three menu items. “Sign Up” and “Privacy” are links to a web-page off my site (in this real life example the custom links are actually to a subdomain of the same site, but they could be to any url address) while “About” links to a page I have created.
To create a sub menu you simply drag the particular menu item so it sits under the main menu, so, in the example below, “Privacy” will appear as a drop down option under “About”
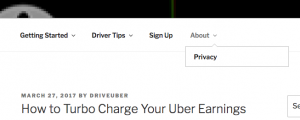
This is how it will look on your website. Privacy appears as a drop down menu item from About (the mouse is hovering over the down arrow which is why you can see the menu item Privacy).
You will notice that the menu headings Getting Started and Driver Tips also have arrows. This means that there are sub menus.
‘
Widgets
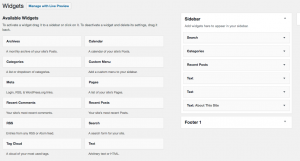
Widgets are small pieces of extra functionality that you can place on your website, usually in a sidebar or the footer of the site. Commonly used widgets include a search button, recent posts or a list of categories.
The ‘text’ widget allows you to create your own custom functionality by inserting html code. This is how a web site owner is able to place advertisements on their site. It’s easier than it sounds, as any ad company (such as Google AdSense) will simply give you the code to copy and paste.
If you’re reading this article on a desktop, look at the right hand side of this page to see examples of widgets that this site has placed in the sidebar.
The area in the middle of the screen is called the work area. This is where you can write, edit, and delete posts as well as adjust settings.
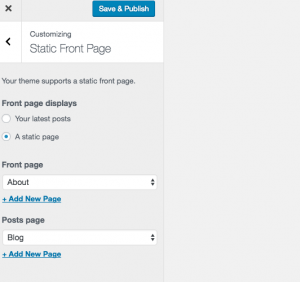
Static Front Page
This is an option that determines what your home page will look like. Do you want a specially designed home page or perhaps, if you’re a blog, you just want to display your latest posts? In the example below i have chosen the About page to be the home page, but you can select any page or post.
Posts
This is where you create posts for your blog and can view all your existing posts including drafts.
Create a new post by clicking “Add New” or using the “+” sign along the top menu. A screen will open up allowing you to start writing your masterful post. Place a title at the top (in this example “Creating a WordPress Site”) and your content in the box below.
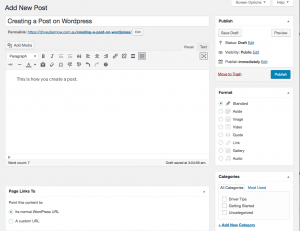
You can format the post in lots of ways, eg change the colour of the text, use bold, or italics, or use the really lame cool strikethrough feature. You can’t usually change the font type or size as these are generally pre-set in other parts of the site’s theme.
The slight exception is the use of the box on the top left (showing the word paragraph) which has drop-down options of Heading 1 through to Heading 6 as well as pre-formatted as options.
I say slight, because although the use of these formats will change the look and size of the writing in a post, they also install meta tags into your post, helping search engines find out what your post is about. They should not be overused.
You can add images to your posts by clicking the “Add Media” button on the top left, where you’ll be prompted to upload an image or choose from a previously uploaded image.
Images can be set to appear in the middle of the page:
![]()
![]() or set to the left or right with text of the post wrapping around the image
or set to the left or right with text of the post wrapping around the image
You will need to assign a category to your post. Categories are used on WordPress to help keep everything in order. A blog about shoes might have categories for mens shoes, womens shoes and childrens shoes. A post can belong to multiple categories. If you do not set a default category, WordPress will allocate it to the “uncategorized” category.
You can also assign tags to your post. This will help readers find the information they are looking for, and help search engines find your post.
You can save your post as a draft at any time and return to edit it later.
Once your post is finished, click “publish” to make it live or schedule it to be published at some time in the future. You can edit your published posts at any time.
Media
Media refers to the images you place on your website and is managed from this menu item. You can add items to the Library (‘add new’) by uploading or dragging and dropping. You can also view, sort and delete images from the Library.
Pages
You create and edit pages in a very similar way as for posts. The differences revolve around the difference in the purpose of the two.
A page is static information, while a post is more like news. Your terms and conditions, or privacy policy or information about you or your company should be set up as a page. A page does not carry any temporal data, unlike a post which can be sorted into chronological order (typically, the latest posts appear at the top).
All pages have a hierarchy and you will be asked to specify a parent (or no parent) when you create a page. The hierarchy is used to help readers and search engines understand the logic of your site. For example, you might create a page called International Offices to explain that your company has offices overseas. You then create another page called eg Singapore which lists all the details of the Singapore Office. This page would have “International Offices” as its parent page.
Comments
You can determine whether you will allow comments on your blog, and whether they have to be pre-approved in the Settings section.
All comments made on your blog will appear in the Comments sections and you will then have the option to approve or otherwise from here.
Plug Ins
Plug ins provide extra functionality for your site. You can search for and add, activate and de-activate your plug-ins from here.
There are hundreds of different plug-ins available. Please see our post about using plug-ins on your WordPress site for more details.
Users
If you have other people you are writing posts for you or editing your website you can add them as a user from here. Users can have limited or full access depending on what you, as administrator, decide to allow.
Settings
This is where you set the basics for your site, including date and time formats, emails, whether you allow comments and the format of your permalinks.
So that’s the the dashboard for you! Once you’re familiar with what all these menu items do and mean you’re 90% of the way towards building your website/blog. Have a look around and a play and test all the features early on before you start promoting your site. Once your site is up and running you probably want to minimise the changes (especially to permalinks) that you make so it’s best to know what you want and stick to it.
Summary
Although it can seem daunting at first, the WordPress dashboard is actually very intuitive.
Final tip:
When you’re starting out building a website, i like to open the site in two tabs (or ideally on two screens). one is the dashboard where I edit the website, while the other tab is the site itself where i can see all the results of the edits. It’s quicker than continually exiting the dashboard to see the results of your good work. All you need to do is refresh the site on the other tab.